PDF

PDF is a very common, versatile file format for sharing documents created by Adobe. These files can be made accessible in Adobe Acrobat using its robust accessibility tools. Though the number of options that these tools provide can be intimidating at first glance, this page will walk you through how to use the accessibility checker and fix any errors it detects.

Before You Continue

Make sure that the text in your document is selectable – meaning that you can highlight it with your cursor. For more information about this, see our guide to text. We recommend searching for a digital copy of your text online, but if you can’t find one, you can also use the OCR tool within Adobe Acrobat.

Please note: this guide uses the New Acrobat for its instructions. You can enable New Acrobat in the view menu.

Accessibility Tools

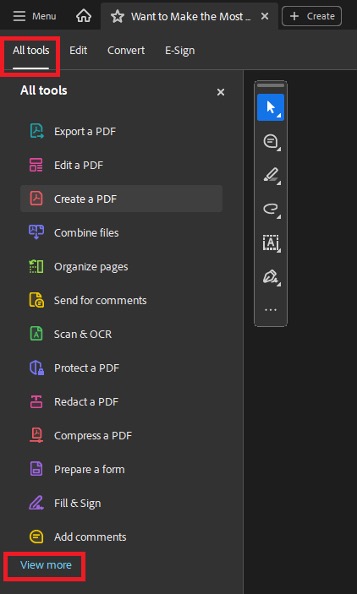
Accessibility tools may not be immediately visible in Adobe Acrobat if you haven’t used them before. To open the accessibility tools in new acrobat, select “all tools” and click “view more” near the bottom of the list:

""

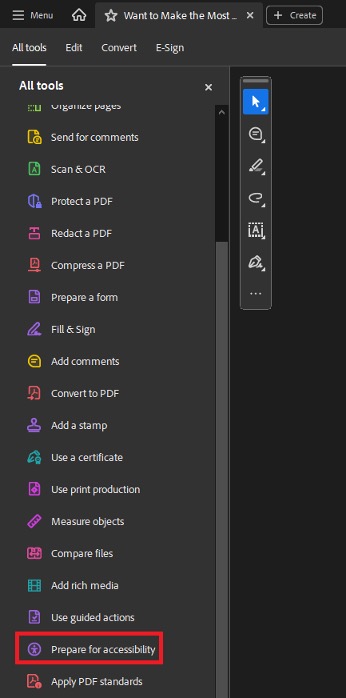
This will let you see all the tools. Find “Prepare for accessibility” and click it. You can also drag the tool to a higher spot on the list, so you can more easily access it for future use.

""

Adobe Acrobat’s accessibility checker can be accessed through the "Prepare for accessibility" toolbar.

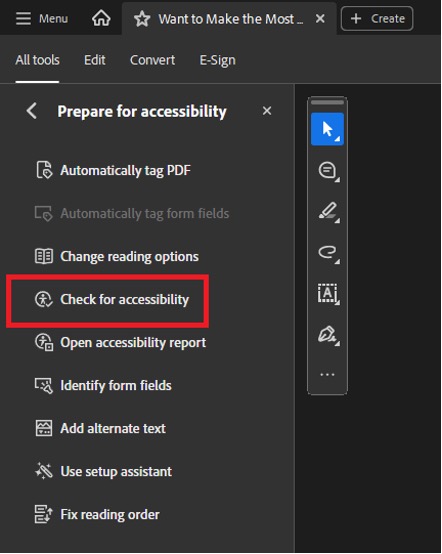
To use the checker, be sure to click “Check for Accessibility” and not “Open Accessibility Report”:

""

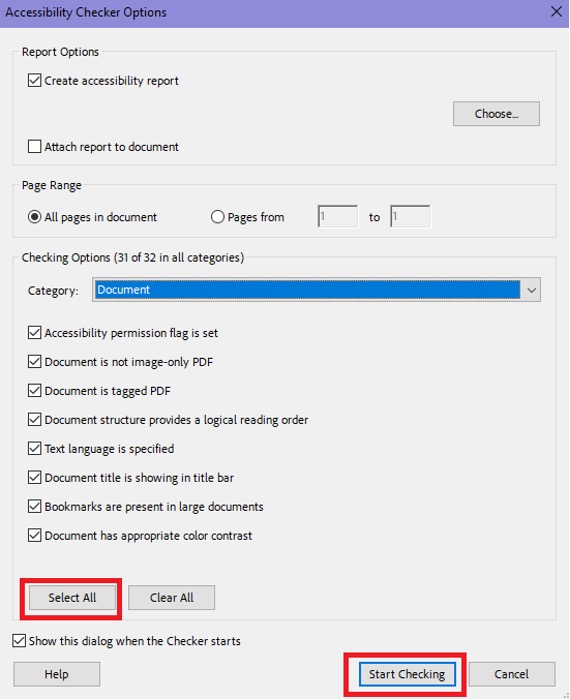
Then in the popup, click “select all” if any categories are unchecked and then start checking:

""

This will give you a full list of all the detected accessibility issues in your document. From there, you can use the Fixing Errors guide below to find and fix the individual errors in your document.

The accessibility checker does not update automatically, so after making changes, you’ll need to run the accessibility checker again.

Accessibility Tags tell assistive technology, like screen readers, what parts of your documents are. They are not only critical for people with disabilities but extremely helpful for navigation as well.

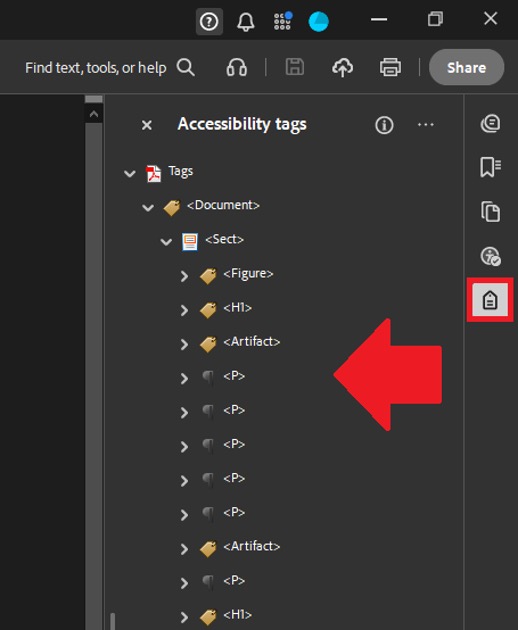
You can see your documents accessibility tags by clicking the accessibility tag icon in the side panel:

""

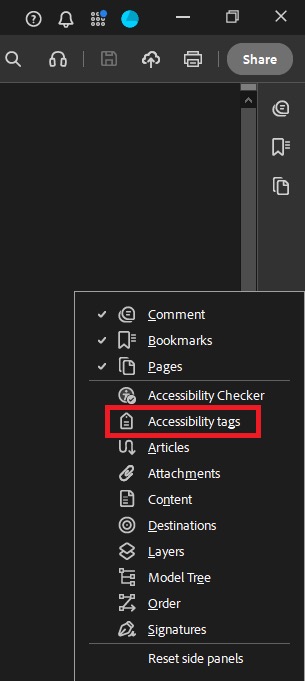
If you don’t see the icon, right click the side panel and enable it using the context menu:

""

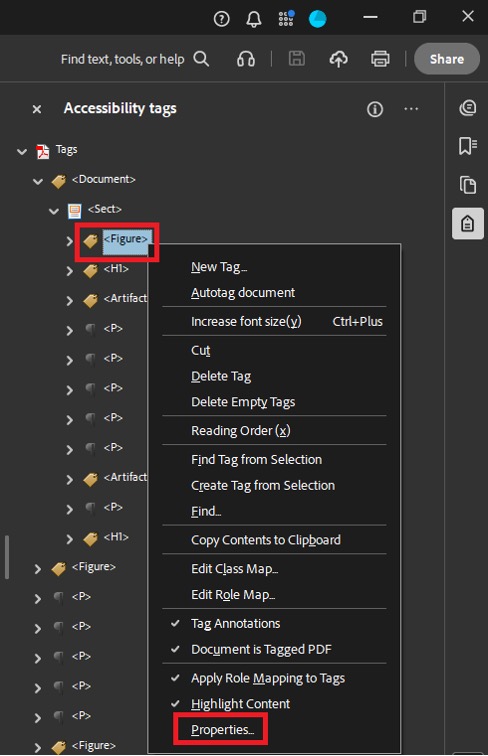
Many accessibility issues must be fixed by changing accessibility tags. To change them, simply right click the item and select “properties” from the context window:

""

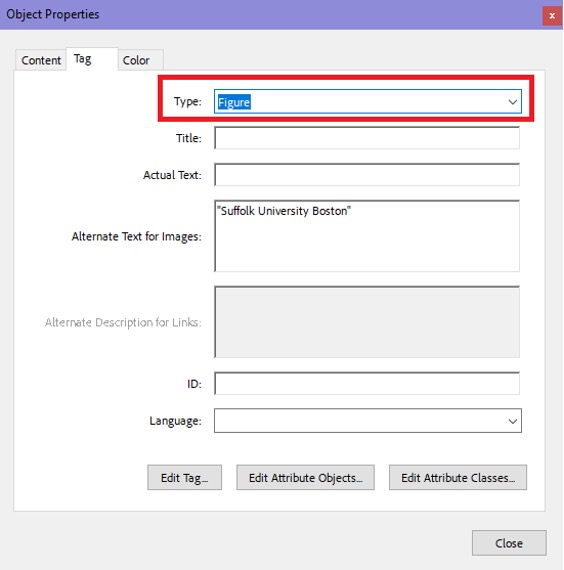
From there, in the properties window, change the tag’s type to the proper one:

""

The Fixing Errors guide below will walk you through what should be changed to resolve certain accessibility errors.

Using the Autotag tool is an easy way to make your document more accessible.

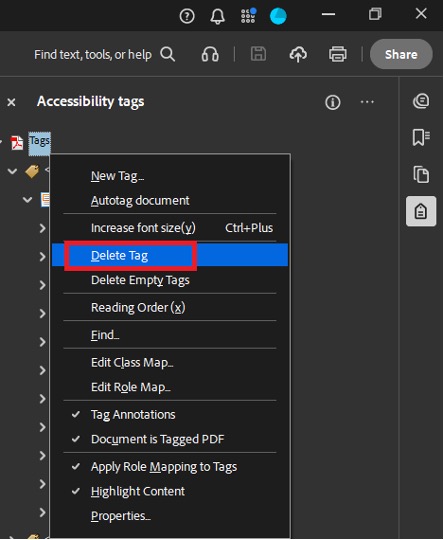
First, clear the existing tags of your document by opening the accessibility tags panel, right click the “tag root” (it has the PDF icon and will be called “Tags”) and select “delete” from the context menu:

""

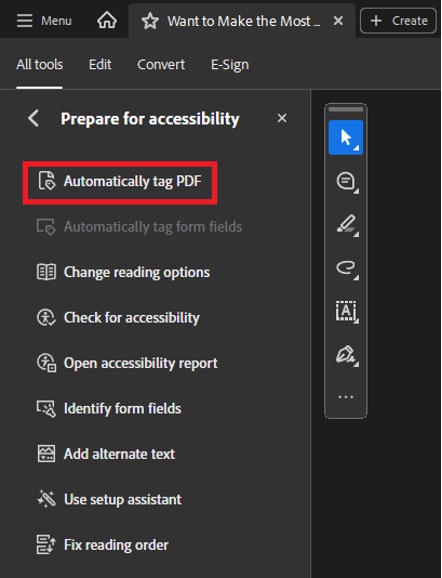
Then, once you have opened accessibility tools, select “Autotag Document”:

""

While the document is being tagged, you might get an error message saying that a tag could not be created. This is fine, and the autotag is still running, so just dismiss the error and continue.

Note: if your document is a form, make sure to create your form fields before you autotag your document.

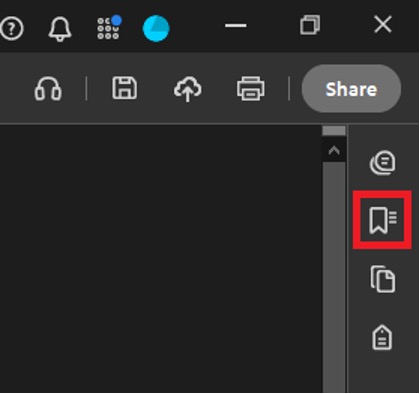
Bookmarks are very helpful for navigation, and in documents that are longer than 20 pages, they are an accessibility requirement. You can check and modify your bookmarks by clicking the bookmark icon on the left side panel:

""

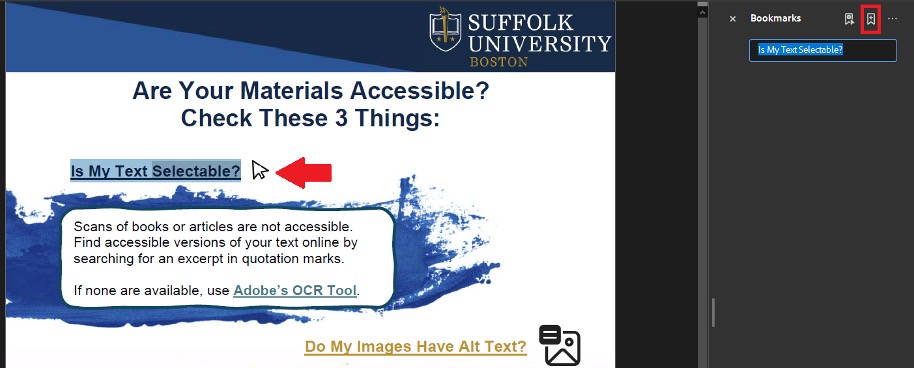
Once the bookmark panel is open, all you need to do to create a bookmark is select the text you want to bookmark and press the add bookmark button:

""

You can also use the “New Bookmarks from Structure...” option to turn every element with a certain accessibility tag into a bookmark. This is not recommended if you are new to Adobe Acrobat, however, as it can make too many bookmarks or useless bookmarks if used improperly.

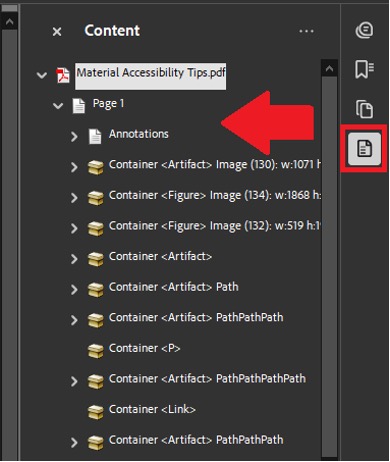
The content tab allows you to see all the content of your document, even if it doesn’t have an accessibility tag. This allows you to troubleshoot accessibility issues, or tag elements that aren’t visible, such as links.

You can access the content tab through the side panel. If it isn’t visible, you can enable it by right clicking the side panel:

""

If you want your students to be able to sign or fill out information in your PDF, you will need to make it digitally fillable to ensure accessibility. This is a fairly simple process, especially if your forms have a simple layout.

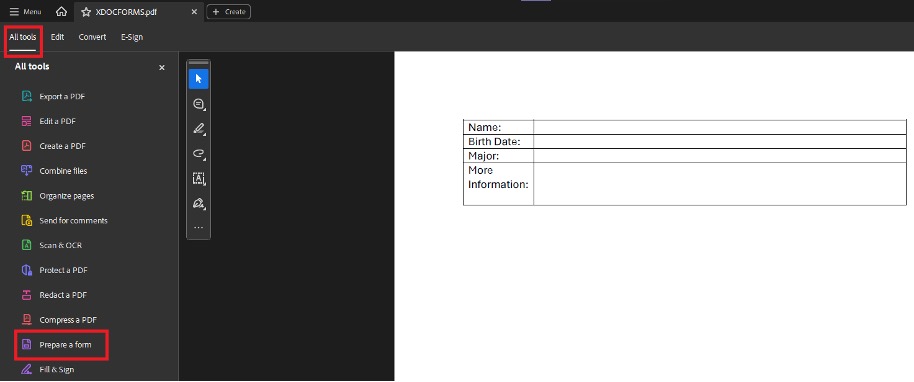
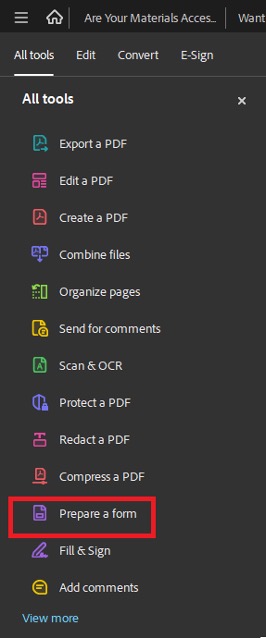
First, go to “All Tools” and click “Prepare Form”. The “Prepare Form” tool should be visible by default, but if you can't see it, you’ll be able to find it by clicking “View More”:

""

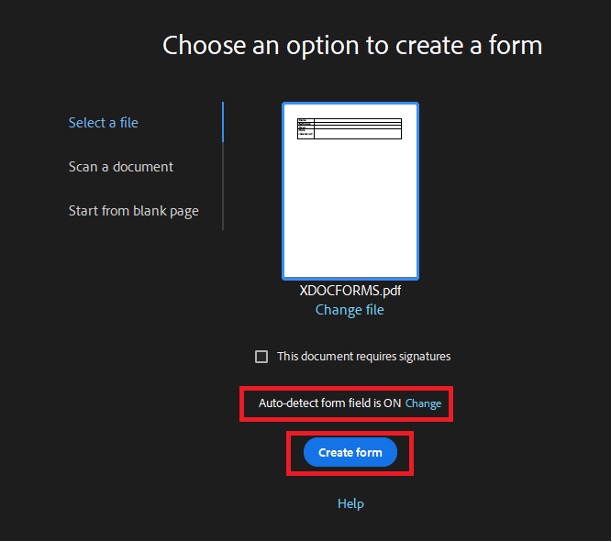
When you do this, Adobe will allow you to automatically generate form fields for the document. Be sure that auto-detect form fields is on.

""

These forms will be accessible, but make sure the names of the forms make sense for what you expect your students to fill in. Additionally, make sure no two forms have the same name. If they have the same name, whatever your student fills out in one will also be filled out in the other.

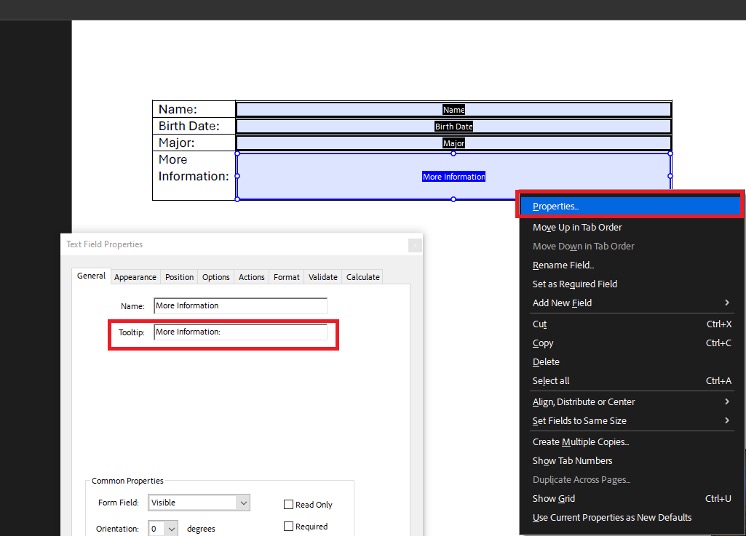
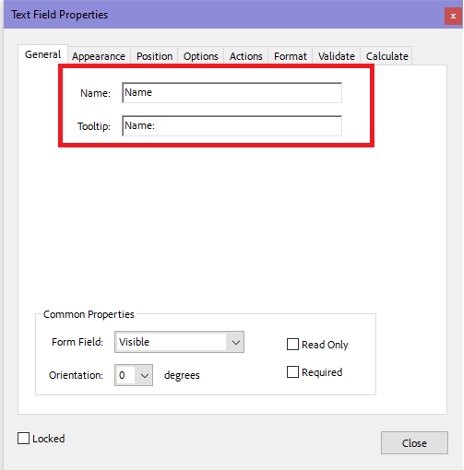
Forms will also need tooltips to be fully accessible. These tooltips can just be the same as the form name, and can be added by right clicking a form and selecting “properties” from the context menu:

""

If you are working with a scan, you can use Acrobat’s OCR tool to attempt to make the text selectable. Note, before trying this, we suggest searching the internet for an already existing accessible copy of your file by searching for an excerpt from the text in quotation marks.

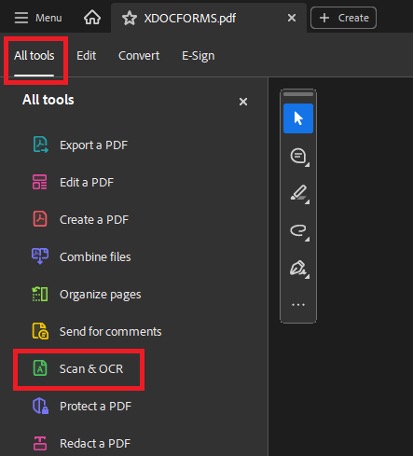
To use Acrobat’s OCR, you can open “All Tools” and select “Scan & OCR”:

""

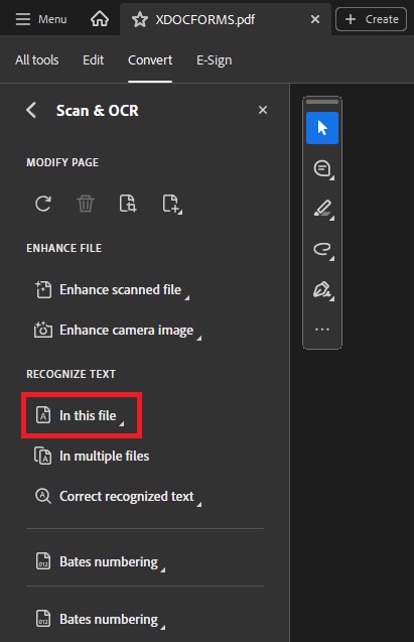
Once the tool is open, select “Recognize Text In this file”:

""

Once the text has been converted, make sure that it was recognized correctly because OCR can sometimes cause errors. Select the text and copy it into another document to make sure that it was not corrupted.

If you are a Suffolk faculty or staff member who is working on a document, you cannot find an accessible version, and OCR is not working, contact [email protected] for assistance.

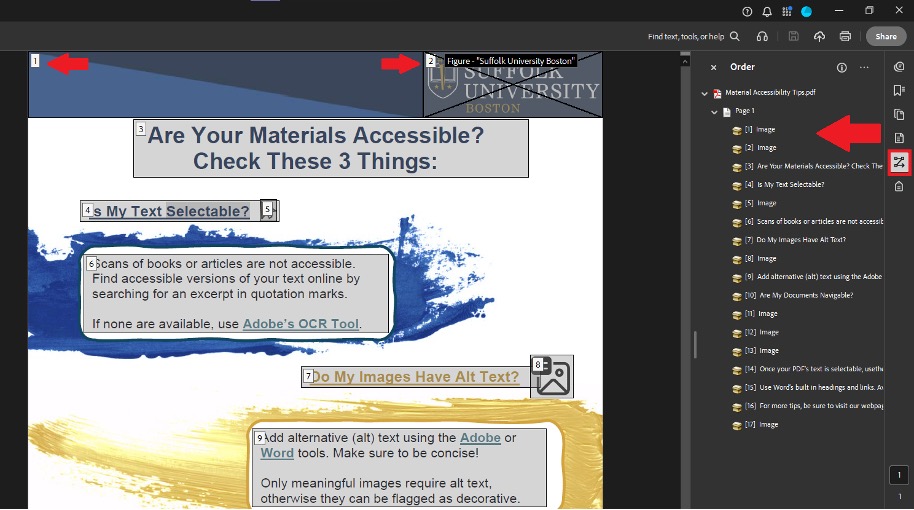
Using the reading order panel, you can check the order in which text will be read for students using text to speech tools or screen readers.

You can access reading order through the Order tab on the side panel. If it isn’t visible, you can enable it by right clicking the side panel:

""

While the order panel is open, you can see the reading order numbers inside the document itself.

To change the reading order, you can drag and drop the element in the order tab. Note: doing this can sometimes change the layer that the element is on which may cause it to become invisible. To avoid this, always drag elements down instead of up.

Fixing Errors

When using Adobe Acrobat’s accessibility checker for the first time, it might display a number of errors. Don’t worry, most of these are incredibly simple to fix. In fact, if your document has a large number of errors, you can often resolve most of them autotagging the document using the "prepare for accessibility" toolbar. Find your errors below to see our recommended fixes:

These errors are general errors with a document’s overall structure or properties.

Tagged PDF

This simply means your PDF is not tagged. Autotag the document using the "Prepare for accessibility" toolbar to fix this error. However, be sure that your PDF’s text is selectable before you do.

Logical Reading Order

Logical Reading Order is something that Adobe Acrobat cannot check automatically. You can check to make sure the reading order makes sense by opening the reading order panel. If the reading order looks good to you, you can indicate that by right clicking on the error and selecting “Pass” from the content menu; though this step of passing the error is entirely optional.

Primary Language

This error appears when the primary language of a document is not automatically recognized. To fix it, simply right click the error, select “Fix” from the context menu, and then select the correct language from the drop down.

Title

The title error is extremely common and just means that the title field in your document’s properties is blank.

If your document’s file name is short, simple, and descriptive, you can ignore this error, since if the title name is blank, the document will default to using the file name instead. If the file name is longer, convoluted, or uses abbreviations, it might make sense to give your document a title.

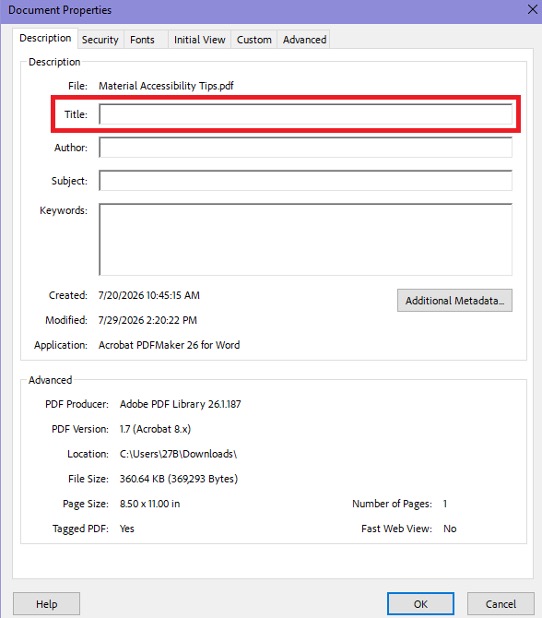
You can add a title to your document by opening “Document Properties...” from the menu dropdown on the top left, or by using the hotkey CTRL-D. Then, while in the properties window, simply fill in the title field:

Screenshot of a document properties window for a PDF titled "Material Accessibility Tips.pdf" showing metadata fields

Bookmarks

The bookmark error will trigger if your document is more than 20 pages and does not include bookmarks. See the section on bookmarks above for tips on how to add them.

Color Contrast

Color contrast cannot be automatically checked by Adobe Acrobat and needs to be checked manually. If you are using high contrast in your document you are likely fine, but you can always double check using WebAIM’s Contrast Checker.

Page Content errors typically have to do with text and text-like elements.

Please note, this category also includes errors for Tagged Multimedia, Screen Flicker, Scripts, and Timed Responses which only affect advanced documents and may involve more involved fixes. If you need help with any of these, contact [email protected]

Tagged Content

This error occurs when some content has accessibility tags, but some do not. The quickest way to resolve this error is to delete all tags and then autotag the document again. You can see how to do this in the autotag section on this page's Accessibility Tools section.

For more advanced users who do not want to delete their existing tags, you can also fix this error by using the “Fix Reading Order” tool, in the "Prepare for accessibility" toolbar. The fix reading order tool will allow you to manually add accessibility tags to content.

You can locate the offending content by clicking the arrow next to the error and then selecting the content from the list. This will highlight it in your document.

Tagged Annotations

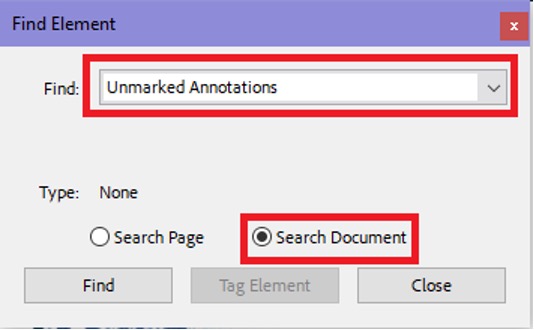
This error means that some annotations in the document (most commonly links) are not correctly tagged. To fix this error, you’ll need to open the Content Tab, right click the content root (the item at the top of the list) and select “Find...” from the context menu.

Then, in the find element window, use the drop-down bar to select “Unmarked Annotations” and change the search parameters to “Search Document”. This will allow you to go through each annotation in your document and tag it appropriately.
""

Tab Order

Tab order errors are easily fixed by right clicking the error and selecting “Fix” from the context menu. Adobe Acrobat will automatically correct the issue.

Character Encoding

The character encoding error means that some of your document’s text is corrupted. This can happen if a file changes format too many times, was generated by AI, or text was not readable by OCR.

While corrupted text may be readable visually, it is not machine-readable; meaning that it cannot be searched and will not work with assistive technologies. To fix this issue, the corrupted text will need to be manually removed.

The first step to fixing this error is identifying the corrupted text. To do this, try copying and pasting the text from your document into another program like Word or notepad. If text doesn’t transfer cleanly, you’ll know what’s corrupted.

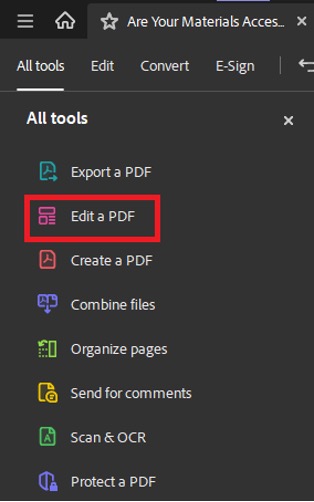
Once the corrupted text has been identified, you can edit the document using the “Edit a PDF” toolbar from the tools menu:
""

If the error is persistent, try converting the document to a PDF from its original file format again.

Navigation Links

This error will automatically trigger once your document exceeds a certain number of links and is just an advisory to check for redundant links. If all your links go to the correct place, and there are not too many that go to the same location, it can be disregarded.

PDFs are often used for forms, and Adobe Acrobat can easily make those forms fillable on a computer. This not only will save your students the trouble of printing and scanning the document, but it is also critical for students using assistive technologies.

Tagged Form Fields

This error is triggered when your form fields are not tagged and is easy to fix. Once you have added all your forms to the document, autotag it from the "Prepare for accessibility" toolbar.

For more advanced users who do not want to delete their existing tags, you can also tag your form fields by using the “Fix Reading Order” tool.

Field Descriptions

All form fields need a title and a tooltip (these can both be the same).

To edit a field’s title and tooltip, you’ll need to open the “Prepare a form” tool under all tools.

""

Once you’ve opened that tool, you’ll be able to right click on form fields, select properties from the context menu, and then change the name and the tooltip of the form field accordingly.

""

Any images or figures in your document need alt text for students using screen readers. They also are helpful in areas with poor reception where images might not be downloaded properly.

Figures Alternative Text

This error means that there are images in the document without alt text. You can either:

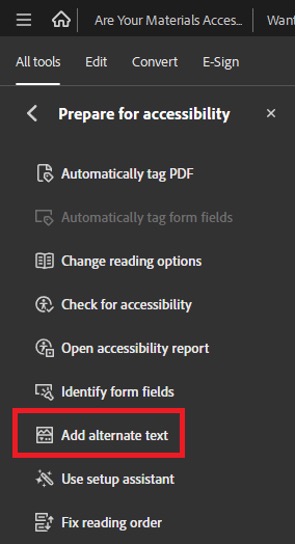
  1. Click “Add alternate text” under the Prepare for Accessibility tool:

    ""

    This will let you navigate through all the figures in your document and find their alt text. You can see images you have already given alt text this way. Marking a figure as decorative removes it from this list.
  2. By right clicking the error and selecting “Fix” from the context menu, Acrobat will provide you with a list of all the figures in your document that have no alt text and allow you to add it.

For more information about how to write good alt text, see our guide to images on the Accessible Content Guide page.

Nested Alternative Text

This error most frequently happens when a figure tag is incorrectly nested. To fix it, first show the list of offending items by clicking the arrow next to the error. Then, right click an item and select “Show in Tags Panel” from the context menu.

The figure will likely be nested – underneath and indented – below another tag. Simply drag and drop the figure above the tag that it's nested under, and that should resolve this error.

If this fails, it might be best to delete the tag root and autotag the document.

Associated With Content

This error means that there is a figure tag with alt text, but it is not associated with any image. This usually only occurs after you’ve manually manipulated the document accessibility tags.

To fix it, first show the list of offending items by clicking the arrow next to the error. Then, right click an item and select “Show in Tags Panel” from the context menu. Then, just press delete or right click the tag and select “Delete”.

Hides Annotations

This is a rare error that happens when an annotation is nested under an object with alt text, since PDFs cannot display both.

To fix it, first show the list of offending items by clicking the arrow next to the error. Then, right click an item and select “Show in Tags Panel” from the context menu. Simply drag and drop the annotation above the figure that it's nested under, and that should resolve this error.

Other Elements Alternative Text

This error most commonly occurs after marking a figure as decorative fails.

To fix it, you’ll need to tag the element as a figure again – either by autotagging the document or using the “Fix reading order” tool in the “Prepare for accessibility” toolbar.

Once the element is tagged as a figure again, try adding alt text. If you flagged the figure as decorative before, use the empty quotation marks (“”) shorthand for decorative instead. This should fix the error.

Tables are one of the best and most accessible ways to convey large amounts of information, and Adobe Acrobat lets you fine-tune exactly how your table is read for students with assistive technologies.

Resolving all these issues involves opening and navigating the Accessibility Tags panel.

Rows

This error occurs if there are any table row (<TR>) tags that are not nested underneath a table tag.

Deleting the misplaced tag or moving it to the correct spot in its table will fix this error.

TH and TD

This error occurs if there are any table data or table header (<TD> or <TH>) tags that are not nested underneath a table row (<TR>) tag.

Table data and table headers are the individual cells that make up a row, with <TH> cells being the contextual ones.

Deleting the misplaced tags or moving them to the correct spot in their row will fix this error.

Headers

All tables need headers. Headers are the contextual cells, often located at the top or far left of a table, that convey meaning to the table’s other cells. If this error is showing, it means that there is a table that does not have headers.

To fix this, go to the accessibility tags panel and open the problematic table and its rows. You can also jump straight from the accessibility checker to the offending table by right clicking the element in the checker and selecting “Show in Tags Panel” from the context menu.

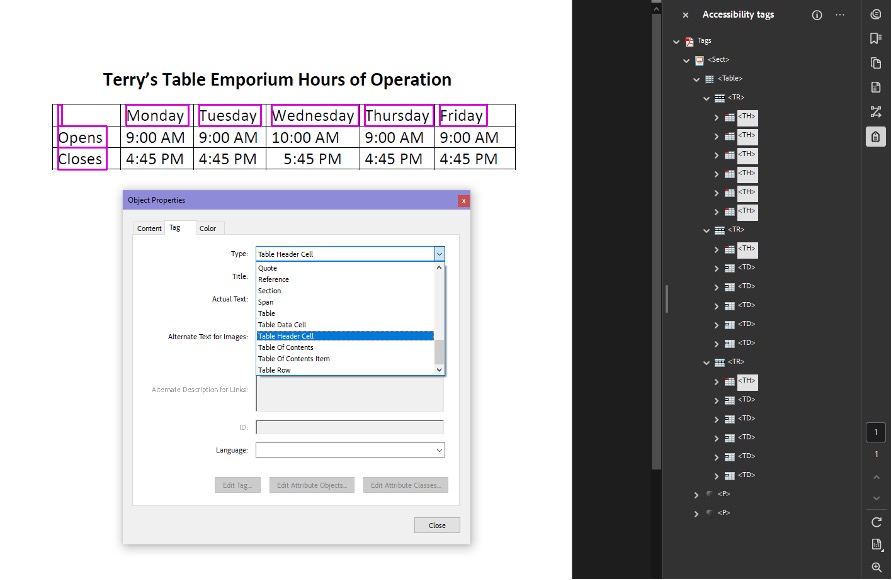
Once the table is open, select all the cells that need to be headers (you can select multiple items by holding CTRL), right click, and press properties. This will allow you to change all the mislabeled cells to “Table Header Cell”:

""

This should resolve the error.

Regularity

The regularity error occurs when a table does not have the same number of cells in each row. This is a requirement for tables to be read by assistive technology.

This issue usually happens when Adobe Acrobat had a difficult time deciphering one of your tables, which is common for non-standard tables or tables that span across multiple pages. Before trying to manually fix this, try autotagging the document again.

In order to manually fix this, you’ll need to open the accessibility tags panel, open the table, and manually check to see if any row has a different number of cells. If your table has empty cells, you may need to create empty tags in their place to balance the numbers. You can do this by right clicking on any cell in that table, selecting “New Tag...”, and then choosing the appropriate type of cell from the context menu.

This issue can be difficult to fix on your own. Don’t hesitate to get in touch with [email protected] for help!

Summary

Table summaries are advanced accessibility features that provide an overall description of the table to users of assistive technology. They can be helpful, but are not a requirement.

Lists are accessibility features in PDFs that allow screen reader users to navigate more easily by helping them skip over long lists of items like a table of context or a glossary. List errors often occur when Adobe Acrobat incorrectly tags a list during autotag.

Resolving these issues involves opening and navigating the Accessibility Tags panel. Though often, autotagging the document again using the "Prepare for accessibility" toolbar will yield better results.

List items

This error occurs if there are any list item (<LI>) tags that are not nested underneath a list.

Deleting the misplaced tag or moving it to the correct spot in its table will fix this error.

Lbl and LBody

If a List contains anything except list items (<LI>), or a list item contains anything besides labels and list bodies <LBody> this check will fail.

There is one heading error – Appropriate Nesting – which means that your headings are not ordered correctly. Headings need to flow linearly, every level 2 heading must follow a level 1 heading, every level 3 heading must follow a level 2 heading, and so on.

This error is common because Adobe Acrobat often guesses the heading level based on font size, since it can’t understand the actual context of the document.

To fix this, find any headings in the Accessibility Tags panel and change their number so they are properly nested. Level 1 is for things like titles, level 2 is for sections, and level 3 is for subsections.

You can find problematic headers easily by going to the error itself, right clicking an offending element, and selecting “Show in Tags Panel” from the context menu.

Sometimes Acrobat can miss your headers completely as well. If this happens, use the “Fix reading order” tool in the “Prepare for accessibility” toolbar to properly flag your headers.

Please note: you may have to repeat this process multiple times to fully resolve this error. Sometimes problematic headers are not detected until the header before them is fixed.